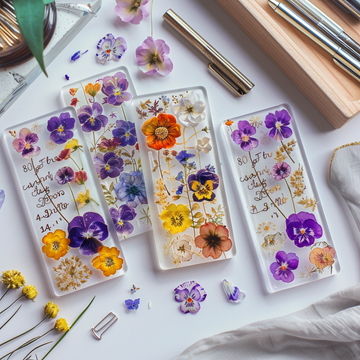
Creating elegant and personalized bookmarks can be a delightful and fulfilling project. Pairing calligraphy with pressed flowers adds a sophisticated touch, making each bookmark unique and special. This tutorial will guide you through the steps to combine calligraphy and pressed flowers for beautiful, customized bookmarks.
Materials Needed- Pressed flowers
- Blank bookmarks or sturdy paper
- Calligraphy pen or fine-tip marker
- Ink for calligraphy
- Clear-drying glue
- Transparent sheets or laminating pouches
- Scissors
- Tweezers (optional)
- Step-by-Step Guide
-
Choose Your Flowers
Select pressed flowers that are flat and vibrant. Flowers like pansies, violets, daisies, and ferns work well. Ensure they are completely dry to avoid any moisture damage to your bookmark.
-
Prepare Your Workspace
Set up a clean, well-lit workspace. Lay out all your materials so they are easily accessible. If you have tweezers, use them to handle the delicate pressed flowers.
-
Design Your Bookmark
Before starting, decide on the design and layout. Think about the placement of the calligraphy and flowers. Sketch a light outline if necessary to guide your design.
-
Write the Calligraphy
Using your calligraphy pen or fine-tip marker, write the desired text on the bookmark. It could be a name, a favorite quote, or a simple word like "Read" or "Dream." Practice on a separate sheet if needed to ensure your calligraphy looks smooth and elegant.
-
Arrange the Flowers
Carefully place the pressed flowers on the bookmark around the calligraphy. Arrange them in a way that complements the text without overwhelming it. Once you are happy with the layout, lightly mark their positions.
-
Glue the Flowers
Apply a small amount of clear-drying glue to the back of each flower and press them gently onto the bookmark. Use tweezers for precise placement if necessary. Let the glue dry completely before proceeding to the next step.
-
Seal the Bookmark
To protect the calligraphy and flowers, cover the bookmark with a transparent sheet or laminate it. If using a transparent sheet, cut it to the size of the bookmark and glue it on top, ensuring there are no air bubbles. If laminating, follow the laminating machine instructions.
-
Trim the Edges
After sealing, trim any excess material from the edges to ensure a neat finish. Use scissors to carefully cut around the bookmark, maintaining a smooth and even edge.
Adding Personal Touches
- Incorporate Different Inks and Colors
Experiment with different ink colors to match or contrast with your pressed flowers. Gold or silver ink can add a luxurious touch to your bookmarks.
- Use Decorative Borders
Add decorative borders or frames around the calligraphy and flowers. This can be done with a fine-tip marker or pre-made stickers.
- Create Themed Sets
Make a set of bookmarks that follow a specific theme, such as seasonal flowers, inspirational quotes, or favorite book titles. This adds coherence and makes for a beautiful gift set.
Designing Themes for Bookmarks
Choosing a theme can make your bookmarks even more special. Here are a few ideas to inspire you:
Seasonal Themes
- Spring: Use flowers like tulips, daffodils, and cherry blossoms. Pair with pastel inks for a soft, fresh look.
- Summer: Incorporate sunflowers, daisies, and vibrant greens. Bright, bold inks complement the lively feel.
- Autumn: Choose warm-toned flowers like chrysanthemums and marigolds. Earthy inks like brown and deep red enhance the fall theme.
- Winter: Use evergreens, holly, and white flowers. Silver or icy blue inks create a wintry effect.
Literary Themes
Create bookmarks inspired by favorite books or authors. For example, use flowers that appear in the text or represent the setting. Pair with quotes from the book written in elegant calligraphy.
Nature Themes
Design bookmarks that showcase different natural settings like meadows, forests, or gardens. Use flowers and foliage that evoke these environments, and choose ink colors that reflect the natural world.
Personal Memories
Create bookmarks that capture special memories. Use flowers from significant places or events and pair them with dates, names, or short descriptions written in calligraphy.
Final Touches
Attach a ribbon or tassel to the top of your bookmark for an added touch of elegance. Choose colors that complement your design.


