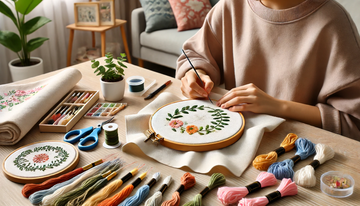
La broderie est un loisir créatif et enrichissant qui permet d'ajouter une touche personnelle à ses vêtements, accessoires et décorations. Créer ses propres motifs peut sembler intimidant au début, mais avec quelques conseils, les débutants peuvent facilement se lancer. Voici quelques étapes pratiques pour vous aider à créer vos propres motifs de broderie.
Commencez simplement
Les débutants devraient commencer par des motifs simples. Privilégiez les formes et motifs basiques comme les fleurs, les étoiles ou les formes géométriques. Ils sont plus faciles à broder et vous aident à prendre confiance en vous. Avec l'expérience, vous pourrez passer à des motifs plus complexes.
Rassemblez vos matériaux
- Tissu : Choisissez un tissu facile à travailler, comme le coton ou le lin. Consultez notre article sur la broderie sur différents tissus.
- Cercle à broder : Maintient le tissu tendu et facilite la couture.
- Fil à broder : Disponible dans une variété de couleurs ; choisissez celles qui complètent votre design.
- Aiguilles : Assurez-vous qu'elles sont pointues et adaptées au tissu choisi.
- Marqueur pour tissu : Utilisé pour transférer votre motif sur le tissu.
- Ciseaux : Ciseaux pointus pour couper le fil et couper le tissu.
Dessinez votre design
Utilisez un marqueur pour tissu pour dessiner votre motif directement sur le tissu. Si vous manquez de maîtrise du dessin, vous pouvez tracer un motif à partir d'un gabarit. Placez le gabarit sous le tissu et tracez-le légèrement. Cette méthode garantit la précision de votre motif et vous aide à planifier vos points.
Choisissez vos points
Commencez par des points de base comme le point arrière, le point satin et le point de nœud. Ces points sont faciles à apprendre et constituent la base de techniques plus avancées. Entraînez-vous à réaliser chaque point sur une chute de tissu avant de travailler sur votre création finale.
Pratique sur des chutes de tissu
Avant de commencer votre projet principal, entraînez-vous sur une chute de tissu. Cela vous permettra de vous familiariser avec les points et d'effectuer les ajustements nécessaires. La pratique vous permettra également d'éviter les erreurs sur votre pièce finale.
Commencer à coudre
Commencez à broder à une extrémité de votre motif. Travaillez lentement et soigneusement, en veillant à réaliser des points réguliers et réguliers. Faites des pauses si nécessaire pour éviter de vous fatiguer les mains. En cas d'erreur, pas d'inquiétude ; défaits simplement les points et recommence.
Ajoutez de la couleur et de la texture
Expérimentez différentes couleurs et textures pour rendre votre création plus intéressante. Utilisez plusieurs nuances d'une même couleur pour ajouter de la profondeur et de la dimension. Essayez de mélanger différents types de points pour créer des textures variées.
Incorporer des éléments personnels
Rendez vos broderies uniques en y intégrant des éléments personnels. Vos initiales, une citation préférée ou un symbole significatif peuvent être vos atouts. Ces touches rendent votre travail encore plus unique et personnalisé.
Touches finales
Une fois votre motif terminé, nouez le fil à l'arrière du tissu et coupez l'excédent. Repassez délicatement le tissu au fer à repasser pour éliminer les plis et fixer les points. Si vous encadrez votre ouvrage, assurez-vous qu'il soit bien tendu dans le cadre.
Prendre soin de votre broderie
Pour préserver l'éclat de vos broderies, évitez le lavage en machine. Nettoyez les taches avec un chiffon humide et un détergent doux. Si nécessaire, lavez le tissu à la main à l'eau froide et faites-le sécher à plat. Évitez d'essorer le tissu pour protéger les points.
Trouver l'inspiration
Cherchez l'inspiration dans le quotidien. La nature, l'art et même la mode peuvent vous inspirer pour de nouveaux modèles. Les plateformes en ligne comme Pinterest, Instagram et Etsy sont également d'excellentes ressources pour découvrir de nouveaux motifs et techniques. Rejoindre des groupes ou des forums de broderie vous permettra de rencontrer d'autres passionnés et de trouver l'inspiration.
Profitez du processus
La broderie ne se résume pas au produit fini ; il s'agit aussi d'apprécier le processus. Prenez votre temps et appréciez chaque point. Créer quelque chose de ses propres mains peut être très satisfaisant et thérapeutique.


