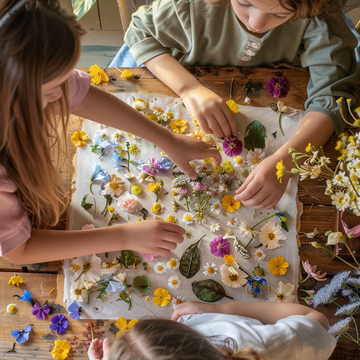
Kinderfreundliches Basteln – Einfache Projekte mit gepressten Blumen für Kinder
Jul 15, 2024
Gepresste Blumenprojekte sind eine wunderbare Möglichkeit, Kindern die Schönheit der Natur und die Freude am Basteln näherzubringen. Diese einfachen und sicheren Aktivitäten fördern Kreativität und Lernen und sind ideal für Eltern und Kinder. Hier sind einige einfache Projekte mit gepressten Blumen, die Sie gemeinsam mit Ihren Kindern durchführen können.
Erste Schritte mit gepressten Blumen
Zu Beginn musst du Blumen sammeln und pressen. Wähle bunte, flache Blumen wie Stiefmütterchen, Gänseblümchen und Veilchen. Lege sie zwischen die Seiten eines schweren Buches oder verwende eine Blumenpresse. Lasse sie etwa eine Woche lang liegen, bis sie vollständig trocken und flach sind. Sobald deine gepressten Blumen fertig sind, kannst du mit dem Basteln beginnen!
Projekt 1: Lesezeichen aus gepressten Blumen
Benötigte Materialien:
- Gepresste Blumen
- Leere Lesezeichen oder stabiles Papier in Lesezeichenform geschnitten
- Transparentes Kontaktpapier oder Laminierfolien
- Kleber
- Schere
- Band (optional)
Schritte:
- Ordnen Sie die gepressten Blumen auf dem leeren Lesezeichen an.
- Kleben Sie die Blumen fest.
- Bedecken Sie das Lesezeichen mit durchsichtigem Kontaktpapier oder laminieren Sie es, um die Blumen zu schützen.
- Schneiden Sie überschüssiges Kontaktpapier oder Laminat ab.
- Stanzen Sie oben ein Loch und binden Sie zur zusätzlichen Dekoration ein Band hindurch.
Dieses Projekt hilft Kindern, personalisierte Lesezeichen zu erstellen, die sie verwenden oder verschenken können.
Projekt 2: Gepresste Blumenkarten
Benötigte Materialien:
- Gepresste Blumen
- Blankokarten oder Karton
- Kleber
- Klartrocknende Versiegelung (optional)
Schritte:
- Ordnen Sie die gepressten Blumen auf der Vorderseite der Karte an.
- Kleben Sie die Blumen fest.
- Tragen Sie für zusätzlichen Schutz eine klar trocknende Versiegelung auf die Blumen auf.
- Lassen Sie die Karte vor der Verwendung vollständig trocknen.
Durch das Erstellen von Karten mit gepressten Blumen können Kinder wunderschöne, handgemachte Grußkarten für Freunde und Familie herstellen.
Projekt 3: Sonnenfänger aus gepressten Blumen
Benötigte Materialien:
- Gepresste Blumen
- Transparentes Kontaktpapier
- Schere
- Band oder Schnur
Schritte:
- Schneiden Sie zwei Stücke transparentes Kontaktpapier auf die gewünschte Größe des Sonnenfängers zu.
- Ordnen Sie die gepressten Blumen auf einem Stück Kontaktpapier an.
- Legen Sie vorsichtig das zweite Stück Kontaktpapier darauf und versiegeln Sie die Blumen darin.
- Schneiden Sie die Kanten ab, um eine saubere Form zu erhalten.
- Stanzen Sie oben ein Loch und fädeln Sie ein Band oder eine Schnur hindurch.
- Hängen Sie den Sonnenfänger an ein sonniges Fenster und erfreuen Sie sich an der farbenfrohen Kulisse.
Sonnenfänger sind für Kinder eine tolle Möglichkeit, Farbe und Licht zu erkunden und gleichzeitig etwas Schönes für ihr Zuhause zu schaffen.
Projekt 4: Rahmen aus gepressten Blumen
Benötigte Materialien:
- Gepresste Blumen
- Bilderrahmen mit Glas
- Karton oder Papier für den Hintergrund
- Kleber
Schritte :
- Entfernen Sie die Rückseite und das Glas vom Bilderrahmen.
- Schneiden Sie den Karton oder das Papier so zu, dass es in den Rahmen passt.
- Ordnen Sie die gepressten Blumen auf dem Karton an und kleben Sie sie fest.
- Lassen Sie den Kleber vollständig trocknen.
- Legen Sie den dekorierten Karton und das Glas wieder in den Rahmen.
- Sichern Sie die Rückseite des Rahmens.
Rahmen aus gepressten Blumen sind eine schöne Dekoration und können mit verschiedenen Blumenarrangements individuell gestaltet werden.
Projekt 5: Gepresste Blumenmagnete
Benötigte Materialien:
- Gepresste Blumen
- Klare Glascabochons oder flache Murmeln
- Magnete
- Kleber
- Klartrocknende Versiegelung (optional)
Schritte :
- Ordnen Sie die gepressten Blumen auf der flachen Seite des Cabochons oder Marmors an.
- Kleben Sie die Blumen fest und lassen Sie sie trocknen.
- Tragen Sie für zusätzlichen Schutz bei Bedarf eine klar trocknende Versiegelung auf.
- Kleben Sie einen Magneten auf die Rückseite des Cabochons oder der Murmel.
- Lassen Sie alles vor der Verwendung vollständig trocknen.
Magnete aus gepressten Blumen sind eine lustige und praktische Möglichkeit, die Kreativität Ihres Kindes am Kühlschrank zu zeigen.


