Creating memorable and unique wedding favors can be a fun and rewarding experience. Personalized bookmarks with pressed flowers are not only beautiful but also practical gifts that your guests will cherish. This blog post will guide you through the steps to make these lovely keepsakes, perfect for adding a touch of nature to your special day.
Materials You'll Need
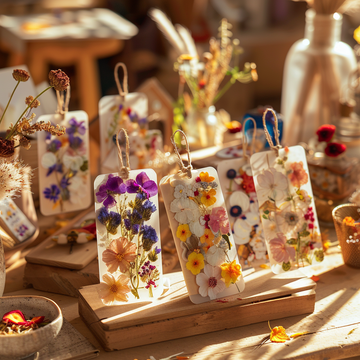
- Pressed Flowers: Collect a variety of flowers. If you’re using a kit, it will already have a great selection.
- Pre-cut Transparent Sheets: These come in various shapes and are ready to use.
- Tassels: Add a decorative touch and make the bookmarks easier to find in a book.
- Stickers: Help to open the transparent sheets without leaving fingerprints or spoiling the sheets.
- Glue: Ensure you have clear-drying glue for a neat finish.
Step-by-Step Guide
Step 1: Gather and Prepare Your Materials
Start by gathering all the materials you’ll need. Lay them out on a clean, flat surface. Ensure you have enough space to work comfortably.
Step 2: Select Your Flowers
Choose the pressed flowers you want to use. Consider the colors and types of flowers that will best match your wedding theme. Arrange them on a separate sheet to visualize how they will look together.
Step 3: Open the Transparent Sheets
Use the stickers to gently open the pre-cut transparent sheets. This will help you avoid leaving fingerprints or spoiling the sheets. Place the stickers on the edges and pull the sheets apart carefully.
Step 4: Arrange the Flowers
Carefully place the flowers on one of the opened transparent sheets. Play around with different arrangements until you find one that you like. Remember, less is often more – a few well-placed flowers can look more elegant than a crowded design.
Step 5: Secure the Flowers
Once you’re happy with the arrangement, use a small amount of clear-drying glue to secure the flowers in place. Be gentle to avoid damaging the delicate petals. Allow the glue to dry completely before moving on to the next step.
Step 6: Add the Top Sheet
Place another transparent sheet on top of the sheet with the flowers. This will create a protective layer and make your bookmark more durable. Use the clear-drying glue around the edges to seal the two sheets together. Press down gently to ensure there are no air bubbles.
Step 7: Attach the Tassel
Thread a tassel through the pre-punched hole at the top of the bookmark and secure it. Tassels add a touch of elegance and make the bookmarks easier to use.
Personalizing Your Bookmarks
To make your bookmarks truly unique, consider adding personal touches. You can write the names of the bride and groom, the wedding date, or a short thank you message on each bookmark. This can be done using a fine-tip permanent marker or printed labels.
Presentation Ideas
How you present your bookmarks can make a big difference. Consider these ideas for a stunning presentation:
- Gift Bags: Place each bookmark in a small, decorative gift bag.
- Ribbon Ties: Tie a ribbon around each bookmark for an added touch of elegance.
- Display Table: Arrange the bookmarks on a display table where guests can pick them up as they leave.
- Place Setting Decor: Lay a bookmark at each guest’s place setting as part of the table decor.
Benefits of DIY Wedding Favors
Making your own wedding favors has several benefits. It adds a personal touch to your wedding, shows your appreciation to guests, and can be a fun project to do with friends or family. Additionally, it can be more cost-effective than purchasing pre-made favors.


